Lab 1 – Webots Robot Simulator
Objectives
The goal of this lab is to guide you to install, configure and familiarize yourself with Webots simulator. At the end of this lab you should be able to run Python code to control your simulated robot.
Webots
Webots is an open-source robotics simulator that can simulate several types of robots and sensors. It provides a complete development environment to model, program and simulate robots and the world they are in, including physics simulation. It is widely used in industry, education and research. Figure 1 shows a screenshot of Webots.
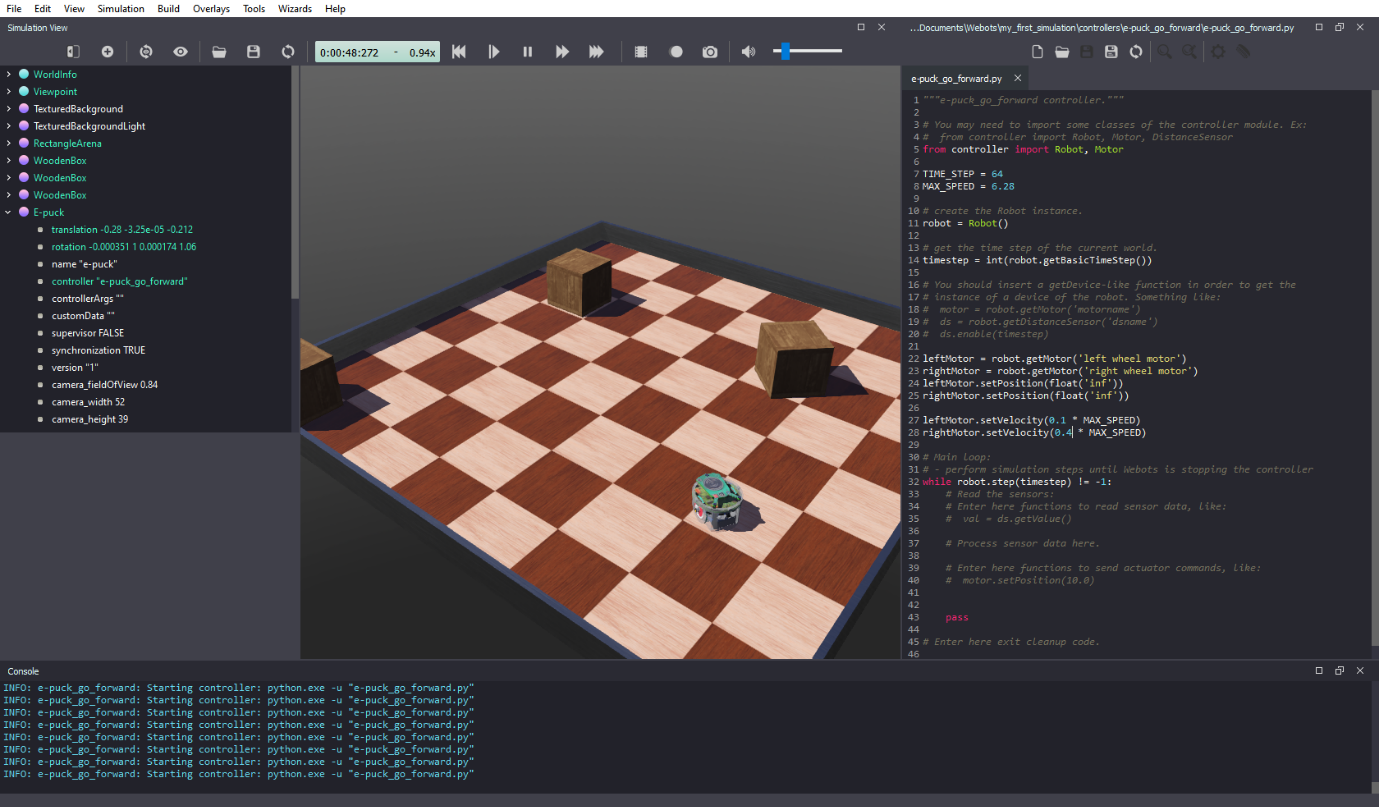 Figure 1. Webots screenshot.
Tasks
The Robotics Simulation Labs require Python3 and Webots. To complete this lab, you need to follow the steps described below.
- Install Python 3 (64-bit version) (in case you already have it, go to step 4). You need the 64-bit version of Python 3, which you can download Python from here.
-
Note (a): When installing Python in Windows, it is highly recommended to select the option “Add to PATH” during the installation to facilitate further configuration of Webots.
-
Note (b): Not all Python versions work with all Webots versions! If you are using an older version of Webots (prior to R2023a), you might need to use an older version of Python 3. For example: Webots R2022b works with Python 3.7, 3.8, 3.9 and 3.10, but Webots R2022a does not support Python 3.10.
-
Reboot your system after installing Python.
-
Test your Python installation: Depending on your system, the command to run Python can be
python,python3,python3.13, or something similar. To test your Python installation (and to make sure that it is correctly added to Windows PATH, in case of Windows), open Command Prompt (cmd), PowerShell or Terminal and typepythonorpython3(in some cases,python3.xx, where 3.xx indicates the version that you installed) and hit ENTER. You can try all three variations to check which one works. If Python is correctly installed, you should see something similar to the output I get in my computer:

Type exit() and hit ENTER to go back to the terminal/command prompt.
- Install Python libraries. You need to install at least NumPy. Optionally, you can install OpenCV, which also installs NumPy (OpenCV is not required for our simulation labs but it is necessary to run some examples that come with Webots). In Windows, to install both libraries, open Command Prompt (cmd), PowerShell or Terminal and type:
pip install opencv-pythonIf you want to install NumPy only, type:
pip install numpyInstructions might be slightly different for Linux and MacOS. Please, see details here.
-
Download and install Webots from https://cyberbotics.com/. To follow the Robotics Simulation Labs you need Webots R2022a or newer. There are versions available for Windows, macOS and Linux. The download and installation process can take a while.
-
Configure Webots to work with Python: In the Webots menu, go to
Tools > Preferences > Python commandand set it topythonorpython3(whatever worked in step 3) to point Webots to your Python installation. If you are on macOS or you haven’t added Python to Windows PATH, you will need to indicate the full path in which Python is installed on your computer. If needed, see installation details here. - Follow all steps of Webots Tutorial 1. Webots Tutorial presents examples in several programming languages. Remember to select
Pythonwhen reading the code!
Known issues and solutions
This section contains some extra information that can help you solve issues you might encounter during Webots installation or usage.
1- If you are getting error messages when trying to run Python code in Webots, make sure you have the 64-bit version of Python, and one of the compatible Python versions. 32-bit or wrong versions of Python do not work properly with Webots.
2- If you are using macOS, you might need to use the full Python path in Webots. See details here.
3- If you are using Linux, Webots might have problems accessing your project folder via symbolic links. A possible solution is to create a folder for the Webots projects on your home partition under your own user name. Another possibility is to install the APT version of Webots. Instructions on how to install the APT version can be found on this link (Thanks to Nick Buls for the tip).
4- If you are using Windows, you might see a message similar to the one below when you try to run Webots installation program. If this happens, just click on “More info” and then click the button “Run anyway” to proceed with the installation (see figure below).

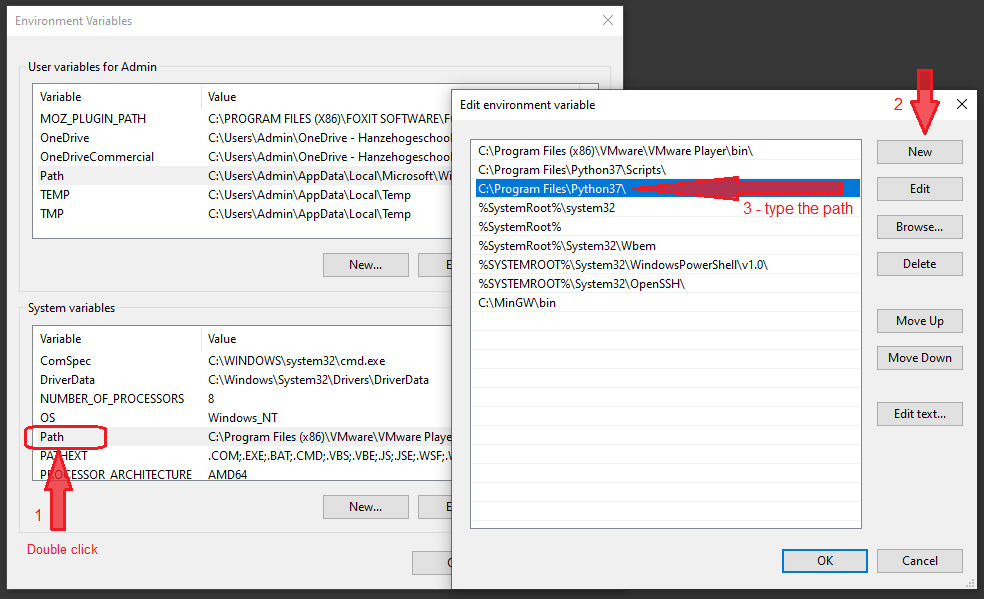
5- If you already installed Python but cannot load it from the terminal/command prompt or if Webots cannot find it, you can add Python to Windows PATH system variable. To add Python to PATH, follow the instructions available in this link. After you add Python to PATH you must reboot your system for the changes to take effect. Note that you have to add only the path for the location where the executable is, without including “python.exe”. A proper configuration is shown in the image below (the path in your computer might be different depending on your Python version and installation):
6- Depending on your hardware, when running Webots you might see a warning message like:
WARNING: System below the minimal requirements.
Webots has detected that your system features an Intel GPU. A recent NVIDIA or AMD graphics
adapter is highly recommended to run Webots smoothly.
 - Shadows have been deactivated.
 - Anti-aliasing has been deactivated.
This is not a problem for the simulations in the labs described here. The demo simulations that come with Webots can be quite heavy, though. If necessary, there are a couple of things that you can do to reduce the amount of computing power required by Webots:
- On the left side of the window, click on
WorldInfo. Then, selectFPSand reduce it to 20 (for example). This reduces the number of frames per second, which increases simulation speed. - Still in
WorldInfo, click onbasicTimeStepand increase it (for example, to 32). This will increase simulation speed, but it will reduce its accuracy. - Go to
Tools -> Preferences -> OpenGLand try to reduceAmbient OccusionandTexture Quality.
Conclusion
After following the steps above, you should have Webots installed and configured to run Python code. You should know the fundamental concepts of Webots and how to write a simple program in Python to control a simulated robot.
In the following lab activities, we will control the virtual robot using Python.
Next Lab
Go to Lab 2 - Line-following behavior with State-Machine.
Back to main page.