Chapter 3 - ROS 2 Tools: Launch Files, Bags, Visualization, and Simulation
This chapter covers a few important tools that will help you harness the power of ROS 2. You will learn how to create launch files, use ROS Bags, understand the role of transforms (TFs), visualize TFs using RViz, learn about Gazebo, and add packages to your existing workspace to run a Create3 simulation.
Objectives
By the end of this chapter you should:
- Know how to create launch files to automate running several nodes from one command.
- Know how to use ROS Bags to record and replay data collected during a (simulated) experiment.
- Understand TFs and be able to visualize them.
- Be familiar with RViz and how to vizualise sensor data.
- Know about simulation with Gazebo.
- Know more about ROS packages and how to add them to your workspace.
3.1 Launch Files
Imagine your Create3 robot project has:
- A LiDAR driver node
- A teleoperation node
- RViz (or Foxglove) visualization
- A SLAM node
You might need to open four terminals and run all those nodes separately, as we previously did with TurtleSim and Teleop. The more complex your project gets, the more nodes you migh need to run.
Launch files allow us to run multiple nodes at once, including defining arguments to pass them on startup. This allows us to launch a complete application with whatever configuration we need using a single command and on a single terminal. Think of a launch file as a startup script for your robot. It will help you save time, reduce mistakes, manage parameters and topic remapping. They become very useful once a robot system consists of multiple interacting ROS 2 nodes.
ROS launch files can be written in Python, YAML, or XML. A launch file written in Python may be more complex to write than one in XML or YAML, but it is more dynamic and has access to low-level features that are not available in the other formats. Detailed explanation about the launch file formats can be found in the ROS 2 Documentation.
In the next activity, we will create an XML launch file to load TurtleSim and teleoperation nodes from one command.
3.1.1 Activity: Creating a Launch File
In this activity, we will create a simple file that launches the TurtleSim and the teleoperation nodes from one command. This activity can also be found on the ROS 2 Documentation, where you can check out equivalent launch files in YAML and Python.
Step 1 - Steup
Most of the time, you will find launch files stored inside a launch directory on each package’s directory. In our case, we will just create it inside our src directory. First, navigate to the /create3_ws/src directory and create a launch directory:
 cd ~/create3_ws/src
 mkdir launch
 cd launch
Create an empty XML file inside your new launch directory:
touch turtlesim_teleop_launch.xml
We will also need to install the xterm package for this exercise, so install it now with:
sudo apt install xterm
Step 2 - Write the launch file
We are going to create a simple launch file that launches both turtlesim_node and turtle_teleop_key nodes from the turtlesim package. Open your newly created file (for example, with VScode: code turtlesim_teleop_launch.xml) and paste the following code into it:
<launch>
  <node pkg="turtlesim" exec="turtle_teleop_key" output="screen" launch-prefix="xterm -e"/>
  <node pkg="turtlesim" exec="turtlesim_node"/>
</launch>
The syntax for launch files is relatively intuitive: to run a node you must define its package name (pkg) and executable file name (exec). Optionally, you can also add other parameters like output and launch-prefix.
turtle_teleop_key requires keyboard input from the terminal. When launched from a launch file, it may not properly capture keystrokes depending on the terminal program being used. We installed xterm because this terminal works well in those situations. Then, we added the option launch-prefix="xterm -e" to instruct it to open a new xterm window to run teleop on it.
Step 3 - Launch
When a launch file is part of a package, the syntax for using it is:
ros2 launch <package_name> <launch_file_name>
In our case, since this launch file is not part of ou package, we can run it directly. First, go to the directory where your launch file is located:
cd ~/create3_ws/src/launch
Then, run it using ros2 launch:
ros2 launch turtlesim_teleop_launch.xml
You should now be able to see two windows, one for the teleop node, and one for the turtlesim node. The one for the teleop node is the smaller one on the right side of Figure 1, which is the xterm terminal.
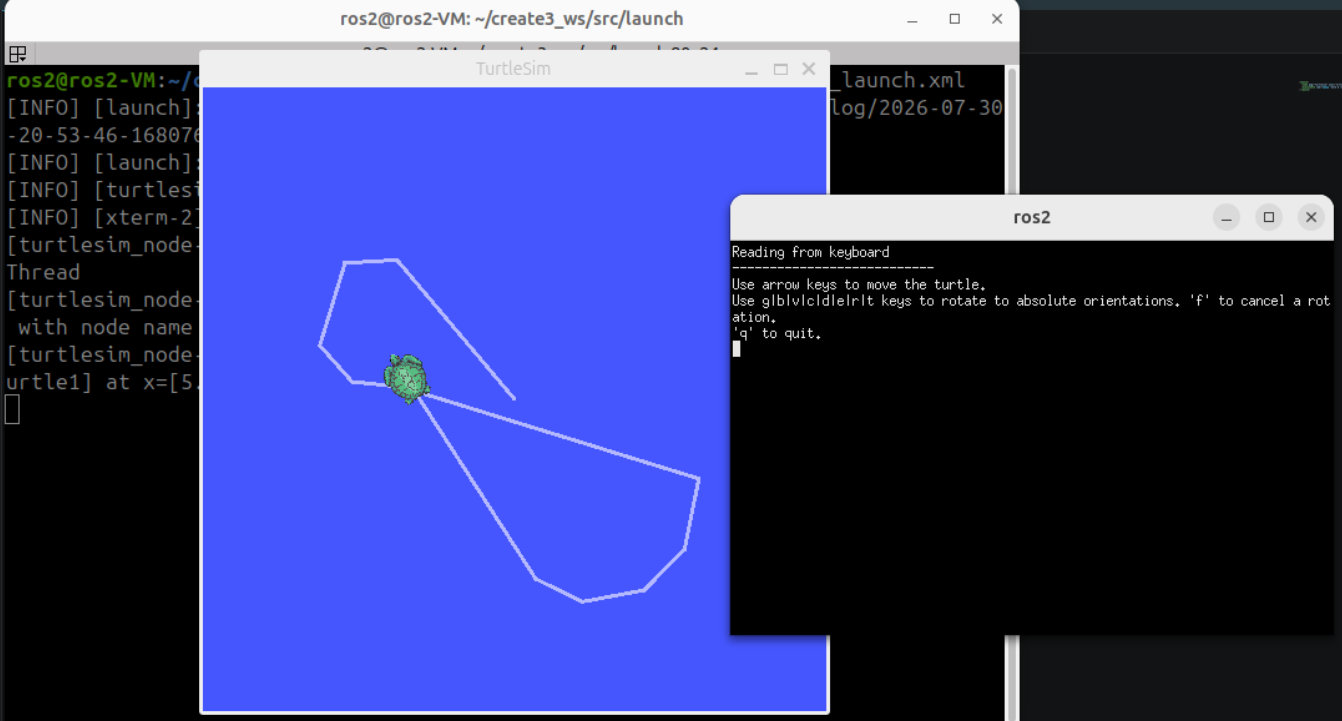
Figure 1. Result of running the turtlesim_teleop_launch.xml launch file: the original terminal is in the back. TurtleSim window in in the center, and the small terminal next to it is xterm running the teleoperation node.
You can find out a lot more of what launch files are capable of by following the ROS 2 tutorials.
Stop the nodes with <CTRL+C> and close the terminal windows when you are done with this activity.
3.2 ROS Bags
As you might have noticed, data sent over topics is not inherently persistent. If a message is not captured by any node as soon as it is published, it will be lost. Although this behaviour is useful in many ways, sometimes data persistence is necessary. For example, when optimizing or testing algorithms, it can be very useful to capture data once during a data collection phase, and use that data later for optimizing algorithms or as training data. Fortunately, ROS provides a utility that addresses this issue.
The ros2 bag utility allows you to store and replay topic data through the CLI commands. In the next activity we will understand the basic concepts of ROS bags.
3.2.1 Activity: Recording and playing back data with ROS Bags
In this activity, we will record a few topics in TurtleSim using the rosbag2 package. Then, we will replay them again. This activity can be found on the ROS 2 tutorials.
Step 1 - Setup
First, let’s create a directory to store our rosbag files. Open a terminal and run the following commands:
mkdir ~/rosbag_dir
cd ~/rosbag_dir
Now, run the turtlesim and turtle_teleop nodes using the launch file created in the previous activity:
cd ~/create3_ws/src/launch
ros2 launch turtlesim_teleop_launch.xml
Step 2 - Record a topic
We will record the /turtle1/cmd_vel topic, which contains all the velocity commands sent from the teleop node to turtlesim. To record a topic, we can use the following syntax:
ros2 bag record <topic_name>
Alternatively, you can record multiple topics in the same bag:
ros2 bag record <topic1_name> <topic2_name>
It is good practice to define the name of the file that contains your bag. You can do it by using the -o flag:
ros2 bag record -o <file_name> <topic_name>
To record the /turtle1/cmd_vel topic in a bag called turtle_movement, open a new terminal window and run:
cd ~/rosbag_dir
ros2 bag record -o turtle_movement /turtle1/cmd_vel
You will see messages similar to those:
[INFO] [1664530714.080295473] [rosbag2_storage]: Opened database 'rosbag2_2022_09_30-11_38_34/rosbag2_2022_09_30-11_38_34_0.db3' for READ_WRITE.
[INFO] [1664530714.080414474] [rosbag2_recorder]: Listening for topics...
[WARN] [1664530714.081898406] [rosbag2_transport]: Hidden topics are not recorded. Enable them with --include-hidden-topics
[INFO] [1664530714.083271733] [rosbag2_recorder]: Subscribed to topic '/turtle1/cmd_vel'
[INFO] [1664530714.083715109] [rosbag2_recorder]: All requested topics are subscribed. Stopping discovery...
Now, switch to your teleop terminal and move the turtle in a pattern that you can recognize later. When you are done, click on the ROS Bag terminal and press CTRL+C to end the recording.
Step 3 - Inspect the rosbag
The command above creates a bag directory called turtle_movement. Inside it, you will typically find two files:
metadata.yaml: contains useful information about the bag, like start/end timestamps, number of messages recorded, topic names and types etc...db3: an SQLite database file that stores the actual recorded messages. In our case, it saves every geometry_msgs/msg/Twist message received on /turtle1/cmd_vel, together with its timestamp and topic information.
You can find out information about the exact data stored inside the rosbag by using the command ros2 bag info <bag_name>. To inspect the rosbag we just recorded, run:
ros2 bag info turtle_movement
You should see something similar to this:
Files:             turtle_movement_0.mcap
Bag size:          11.7 KiB
Storage id:        mcap
ROS Distro:        jazzy
Duration:          8.057979869s
Start:             Jul 30 2026 21:30:34.498193477 (1785439834.498193477)
End:               Jul 30 2026 21:30:42.556173346 (1785439842.556173346)
Messages:          65
Topic information: Topic: /turtle1/cmd_vel | Type: geometry_msgs/msg/Twist | Count: 65 | Serialization Format: cdr
Service:           0
Service information:
This shows you information about the exact topics recorded, their message types, the duration of the recording as well as some metadata about the bag itself like its size.
Step 4 - Replay the files
Now we can replay our recorded topic data. Keep the TurtleSim window open and run the following command:
ros2 bag play turtle_movement
If you have the turltesim window still open, you should see that your turtle repeats the same movements you gave before! Unless the turtle starts exactly at the same pose (position and orientation), it will not follow the same path, but it will reproduce the same relative movements. This is because the bag is playing messages of the topic /turtle1/cmd_vel at the same rate they were recorded.
These same process can be applied to any ROS topic, including images. In fact, you can use the -a option to record all currently discovered topics:
ros2 bag record -a -o turtle_movement
Remember to press CTRL+C in the recording terminal to stop the recording. You can see a list of all recorded topics with ros2 bag info turtle_movement.
3.3 TFs (Transforms) and Coordinate Frames
In robotics, keeping track of the location of various objects in relation to one another and to their environment is crucial for navigation, localization, mapping, sensor fusion, manipulation, and any other task. For example, an image from a camera can indicate the location of objects relative to the camera itself, but this information is only useful for the robot if the transformation between the camera and robot reference frames is known.
A transformation describes the spatial relationship between different coordinate frames. Figure 2 illustrates such concept: the reference frame w is fixed in the world, while the frame r is attached to the robot. The transformation $T^{w}_{r}$ describes the the translation and rotation between the two.
Note: For a mathematical description of transformations, please refer to Rotation representation, by Bang-Shien Chen.
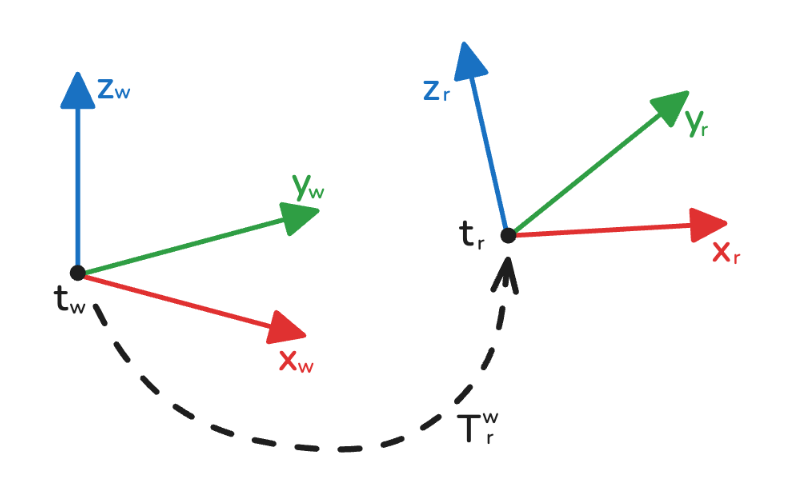
Figure 2. The transformation that describes the translation and rotation between the reference frames w and r. Source: Rotation representation
In mobile robotics, the poses of all sensors need to be defined with respect to the robot frame (by pose we mean position and orientation). By its turn, the pose of the robot needs to be referred to a reference frame (also called coordinate frame) that is usually fixed in the world. There are many possibilities to define reference frames. In ROS, a common representation is shown in Figure 3, where:
- map: global reference frame to define the robot’s coordinates on a 2D map. It is only available when a localization system is running and it is drift-corrected.
- odom (Odometry Frame): world-fixed frame generated from wheel odometry - tracks the robot’s movement from its starting point. Because odometry suffers from drift, after driving around for several minutes, the reported pose will likely differ from the true physical location.
- base_footprint: 2D representation of the robot’s footprint on the ground - typically used for path planning.
- base_link: rigidly attached to the robot itself and moves together with it. It represents the robot’s local coordinate system and is used as a reference for sensors and other components of the robot.
- laser_link: pose of a laser sensor on the robot - essential for interpreting its data for mapping and obstacle detection.
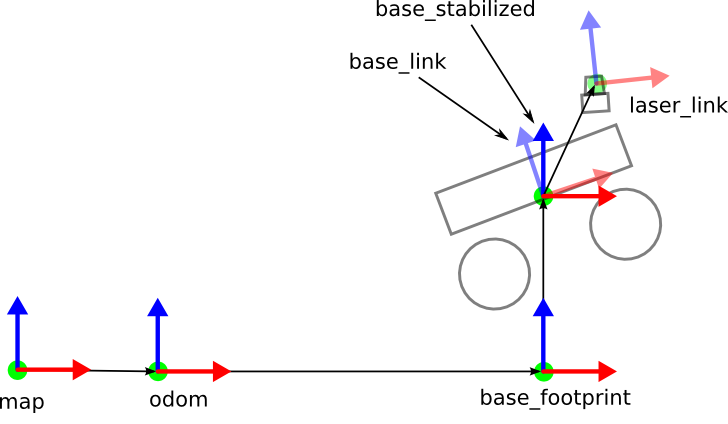
Figure 3. Commonly used coordinate frames for mobile robotics in ROS. Source: ROS Wiki
Often times, there will be at more than 5 different coordinate frames and maintaining the unique transformations to and from each one of these can be challenging, especially when they might change. ROS provides a package that optimizes this process:
tf2 is a library to keep track of multiple coordinate frames over time. It publishes the relationship between coordinate frames (transforms) using a tree structure, allowing knowledge of the transformation between coordinate frames at any point in time. The relationship between these coordinate frames is determined with the so-called tf-tree. It essentially tells with a tree-like structure what is the child-frame’s position in relation to the parent frame.
3.3.1 Activity: Understanding TFs
We are going to use TurtleSim to practice with coordinate frames and TFs. This activity is based on the one available in the ROS documentation page.
Step 1: Install dependencies
Before we start, we need to install the demo package and some dependencies by running the following command:
sudo apt-get install ros-jazzy-rviz2 ros-jazzy-turtle-tf2-py ros-jazzy-tf2-ros ros-jazzy-tf2-tools ros-jazzy-turtlesim
Step 2: Run the TurtleSim tf2 Demo
Now, run the command below to open TurtleSim:
ros2 launch turtle_tf2_py turtle_tf2_demo.launch.py
You will see two turtles: one that starts in the center (turtle1), and another that starts at the bottom of the screen (turtle2). Turtle2 moves towards Turtle1.
Open another terminal and run the teleop node:
ros2 run turtlesim turtle_teleop_key
Now you can control turtle1 using the keyboard keys. Move it around and see how the turtle2 runs after it.
How is this implemented?
In this example, the tf2 library is being used to create three coordinate frames: a world frame, a turtle1 frame, and a turtle2 frame. A tf2 broadcaster is used to publish the turtle coordinate frames, while a tf2 listener is used to calculate the difference between the turtle frames. Turtle2 is moved to minimize that difference.
Step 3: Visualize the TF tree
By using view_frames we can see a diagram of the three frames being broadcast by tf2. This helps illustrate the relationship between the existing coordinate frames. Run the command below to generate a PDF file with the tree diagram:
ros2 run tf2_tools view_frames
Wait a few seconds until the process is completed. Then, open the Ubuntu Document Viewer application and open the PDF file that was saved. You will see something similar to Figure 4. Notice that world is the parent frame of both turtle1 and turtle2 frames.
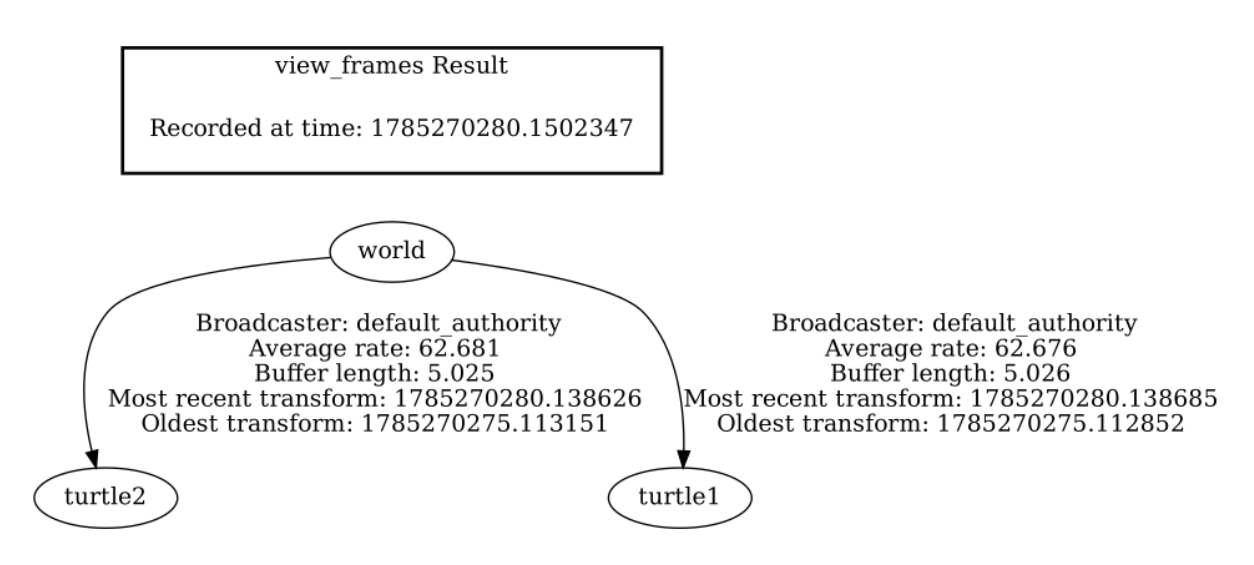
Figure 4. The three coordinate frames that are broadcast by tf2: world (parent), turtle1, and turtle2. Some diagnostic information is also informed, like when the oldest and most recent frame transforms were received and how fast the tf2 frame is published.
Step 4: Understand the representation of the frames
The command above gives you a visual representation of the TF tree, but does not show you the actual pose of each frame with respect to each other. To get such information, you can run the command ros2 run tf2_ros tf2_echo <frame_ref> <frame_robot>. This will print information about translation (coordinates of the origin) and rotation of <frame_robot> with respect to <frame_ref>.
Run the command below to get the pose of turtle1 with respect to the world:
ros2 run tf2_ros tf2_echo world turtle1
This will keep printing the transformation until you stop the execution of the command. Move Turtle1 using the keyboard and see how the transformation changes.
At time 1787392741.395988619
- Translation: [3.475, 9.576, 0.000]
- Rotation: in Quaternion (xyzw) [0.000, 0.000, 1.000, -0.005]
- Rotation: in RPY (radian) [0.000, -0.000, -3.131]
- Rotation: in RPY (degree) [0.000, -0.000, -179.404]
- Matrix:
 -1.000  0.010  0.000  3.475
 -0.010 -1.000  0.000  9.576
  0.000  0.000  1.000  0.000
  0.000  0.000  0.000  1.000
Because the pose of coordinate frames can change at any moment, the transformations are constantly updated. For this reason, the tf2_echo command also informs the exact moment in which the transformation was calculated (At time field).
As you can see, the pose of turtle1 is printed in different formats. You can read it independently as translation and rotation, or combined in the form of a homogeneous matrix. The rotation is also representated in quaternion or roll-pitch-yaw (RPY) angles.
ROS 2 adopts fixed frame RPY, which means that three individual rotations are applied to the original XYZ coordinate axes: roll around X, pitch around Y and yaw around Z. Such concept is illustrated in Figure 5.
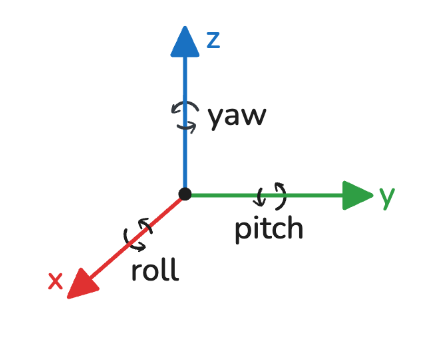
Figure 5. Illustration of the three independent rotations: roll around X, pitch around Y and yaw around Z. Source: Rotation representation
Note: There are many ways to represent orientation, like rotation matrix, quaternion, or axis-angle. For a mathematical description, we refer you again to Rotation representation, by Bang-Shien Chen.
In the command ros2 run tf2_ros tf2_echo <frame_ref> <frame_robot>, both frames can be fixed or mobile. So, both could also be coordinate frames of two different robots, where one robot would be used as reference for the position of the other. Let us use this to investigate the pose of Turtle2 with respect of Turtle1:
ros2 run tf2_ros tf2_echo turtle1 turtle2
Move Turtle1 around and verify how the values change while Turtle2 is moving.
Stop the running nodes and close the terminal windows when you are done.
Explanation on how to write code to create TF broadcaster and listener nodes is available in the ROS 2 Documentation.
3.4 RViz
In Chapter 2 we saw that rqt is a GUI for inspecting and interacting with a ROS system (graphs, topics, parameters, logs, services, plots…). RViz (stands for ROS Visualization) is another visualization tool for ROS, but focuses on visualizing robot data (real or simulated) in 2D/3D. It subscribes to ROS topics and displays the data graphically: robot model (URDF), LiDAR scans, maps, TF frames, paths, point clouds, etc.. RViz is not a simulator! Instead, it can be used together with a simulator (like Gazebo or Webots) to display existing data being published in topics.
3.4.1 Activity: Visualizing TFs with RViz
In this activity we will see how we can use RViz to visualize transforms.
Step 1 - Run the TurtleSim tf2 Demo
We are going to run the same demo we used in the previous activty. Open a new terminal and run the command below to open TurtleSim:
ros2 launch turtle_tf2_py turtle_tf2_demo.launch.py
Open another terminal and run the teleop node:
ros2 run turtlesim turtle_teleop_key
Step 2 - Run RViz
Previously, we visualized a static picture of the TF tree. RViz can also show the TFs, but in a dynaic way. For that, we will start RViz with a configuration file using the -d option. Open another terminal window and run:
ros2 run rviz2 rviz2 -d $(ros2 pkg prefix --share turtle_tf2_py)/rviz/turtle_rviz.rviz
Figure 6 shows a screenshot of RViz with the TFs. As you send commands to the turtle using teleop, you should see the TFs moving on the screen.
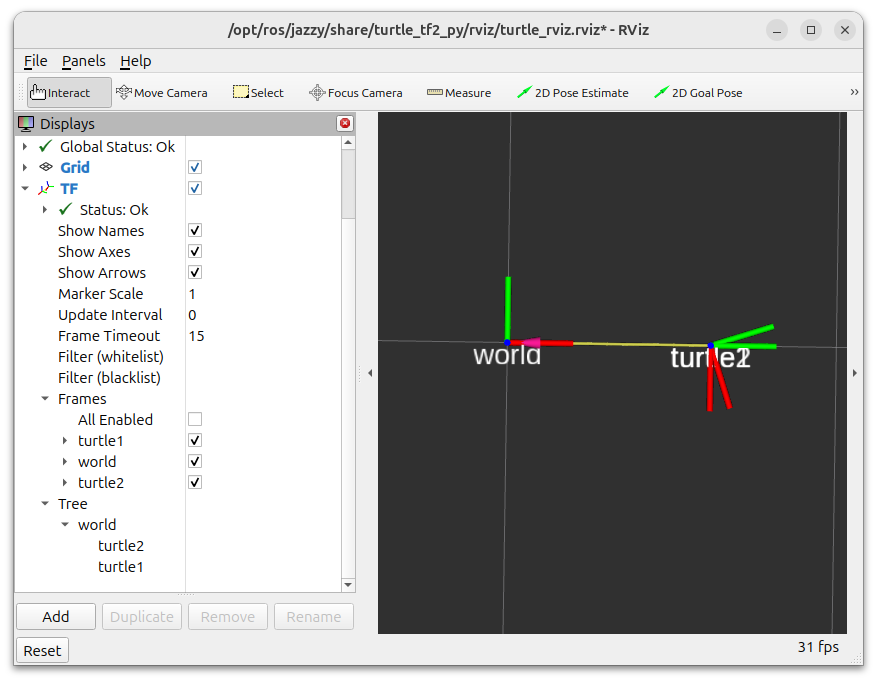
Figure 6. RViz screenshot displaying the TFs of turtle1, turtle2 and world. In the left side menu you can select many options for visualization.
This is just a simple example, but RViz is much more powerful! For details on how to use this tool, check out the RViz User Guide.
3.5 Gazebo
Gazebo is an open-source 3D robotics simulator that is commonly used to simulate robots using ROS. Gazebo uses the ODE physics engine, supports OpenGL rendering and has a vast community that provides plugins for simulating all kinds of sensors and actuators.
With Gazebo, you can create a fully virtual version of you robot, as well as all its sensors and actuators and test it in any virtual environment you need. For most commercially available robots, you will find that the company that created the robot usually provides all the files required to create that simulation, such as a 3D model of the robot, the robot’s URDF model, and Gazebo plugins that can simulate all its sensors and actuators.
From the perspective of a robot programmer, Gazebo can be very useful as it’s simulation publishes nearly identical topics to the ones the real robot does, which means we can test all our code in simulation before deploying to the live robot. You can create a world for your robot using Gazebo’s world editor, or you can use one of the hundreds of community-created worlds. Figure 7 shows a screenshot of Gazebo running a simulation of the Create3 robot.
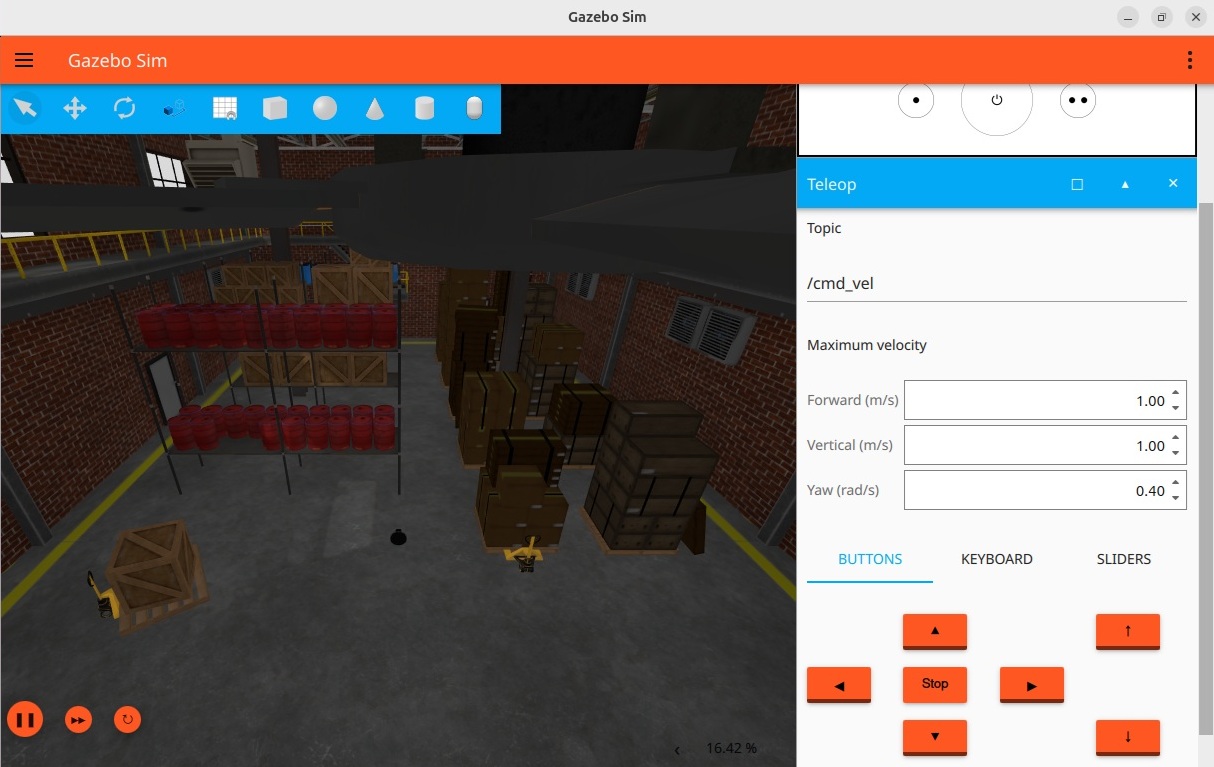
Figure 7. Gazebo screenshot showing the simulation environment. You can control the robot by clicking the command buttons on the bottom right.
More often than not, Gazebo is used to stress test the code before deploying, as it allows us to test any kind of algorithm freely without the risk of damaging the robot or any expensive equipment. It can also save time as the simulation can be sped up to be many times faster than realtime, depending on the machine running the simulation.
For more information about Gazebo, check its getting started guide and Simulation Tutorials.
Note: Gazebo is quite resource demanding and usually does not run well in virtual machines.
3.6 Packages
We dealt with packages in Chapter 1, when we created our own simple package with two nodes (a publisher and a subscriber). But a ROS package can contain much more than nodes, like ROS-independent libraries, datasets, configuration files, third-party software, or anything else that logically constitutes a useful module. If you want to be able to install your code or share it with others, then you’ll need it organized in a package. With packages, you can also use ROS 2 software developed by the ROS community. That’s what we are going to do in this section.
One of the biggest advantages of using ROS is its community and vast collection of packages. A lot of the most common use cases in robotics have official ROS packages created and supported by the team behind ROS, and for virtually any other use case, you can probably find a communty-created ROS package.
Often, you will need to install packages to interface sensors or external devices such as cameras, LiDARs or other sensors with your ROS-based robot. You might also need to install a ROS package that contains an algorithm that might help you in your project (e.g: sensor-fusion, localization, or mapping). For almost all of these cases, you will be able to find them on Github, but you will often need to check if they are compatible with your version of ROS.
Some commonly used ROS packages that you should at least know about are:
-
Nav2 is the successor of the ROS Navigation Stack for mobile robot navigation. It provides easily-customizable methods for dynamic path planning, obstacle avoidance, behavior tree implementation etc.. It is used for all types of navigation applications, including drone navigation (see Elroy Air).
-
MoveIt is a motion planning framework based on ROS. It is one of the most comprehensive and widely used ROS packages for motion planning and grasping support for robotic manipulators of all types. It is widely used in a variety of fields and companies, like NASA, Google, Microsoft, and Samsung.
In the next activity we will practice how to add packages to our existing workspace.
3.6.1 Activity: Adding Create3 packages to run a simulation
This activity will focus on adding new packages to your workspace that will allow you to simulate the Create3 robot and visualize its data.
Note: If you are running ROS on a virtual machine, it is very possible that Gazebo will not run properly, or not run at all. Performance inside a VM may be poor due to flickering, low frame rate, slow simulation, camera rendering issues etc.. Unfortunately, there’s not much to do to fix this because Gazebo is quite demanding. Prefer to execute this activity on a machine with native Ubuntu and ROS to run Gazebo.
Step 1 - Clone packages
We will need to clone some dependencies from Github and build the workspace again. Let’s start by cloning the following packages from GitHub: the Create3 simulation and the Create3 examples packages.
First, navigate to the src directory in your workspace:
cd ~/create3_ws/src
Now, clone the iRobot® Create® 3 Simulator repository for ROS 2 Jazzy:
git clone https://github.com/iRobotEducation/create3_sim.git --branch jazzy
And the Create3 Examples for ROS 2 Jazzy:
git clone https://github.com/iRobotEducation/create3_examples.git --branch jazzy
Step 2 - Install dependencies
Some ROS packages require other packages to work properly (we say that they depend on other packages). The packages we just downloaded need a lot of other packages and other system-dependencies before they can be used. Downloading such dependencies manually would take a very long time and would be prone to error. rosdep is a command-line tool for installing dependencies related to ROS packages.
To install the dependencies for the packages installed, navigate to the top of your workspace and use the rosdep install command:
cd ~/create3_ws/
rosdep install --from-path src --ignore-src -yi
This will install all the required dependencies in the workspace. This process may take a while depending on how extensive the packages are and how fast your system and internet connection are.
You should see many messages to inform you about the installation process while it is being executed. Wait until the installation finishes before moving to step 3. If everything works correctly, the final message should indicate that all required dependencies were installed successfully:
.
.
.
Setting up ros-jazzy-controller-manager-msgs (4.45.2-1noble.20260615.105226) ...
Setting up ros-jazzy-controller-manager (4.45.2-1noble.20260615.164916) ...
Setting up ros-jazzy-gz-ros2-control (1.2.19-1noble.20260615.171757) ...
#All required rosdeps installed successfully
Step 3 - Build the workspace
Because we made changes to our workspace, we need to build it again. We will use the same build tool that we used in the activity of Chapter 1. Navigate to your main workspace directory and build it using the colcon build command:
cd ~/create3_ws
colcon build --symlink-install
This process usually takes a while, depending again on the speed of the system (it took more than 3 minutes in my machine). When the build process is complete you should see a message similar to this:
Summary: 16 packages finished [3min 28s]
Step 4 - Update a package (if needed)
In some cases, the installed ROS packages might not be fully compatible with your ROS installation. If you are running the virtual machine provided by me, this is the case. In particular, ros-jazzy-controller-manager is newer than ros-jazzy-diagnostic-updater, which can be verified by running the command:
apt list --installed | grep diagnostic-updater
The expected result is:
ros-jazzy-diagnostic-updater 4.2.7
If your version is older than that, you should update the package:
sudo apt update
sudo apt install ros-jazzy-diagnostic-updater
After that, run the command above to list the installed packages again to verify that it now has the correct version.
Step 5 - Source your workspace
Remember that you need to source your workspace every time you open a new terminal in order to run the packages installed in it:
cd ~/create3_ws
source install/local_setup.bash
Step 6 - Run a simulation
The packages we installed include files that allow simulating the Create3 in Gazebo and visualize it in RViz.
Note: This is the step that might not work on a virtual machine because Gazebo is quite demanding. If possible, use a machine with native Ubuntu 24.04 and ROS to run Gazebo.
Test your installation by running the create3_gz launch file (which loads RViz, Gazebo and related nodes):
ros2 launch irobot_create_gz_bringup create3_gz.launch.py
During the launch process, you will see many log messages in the terminal and two new program windows. It might take a long while for all nodes to be loaded but, when everything is running, you should see a window with Gazebo (Figure 7) and another with RViz (Figure 8).
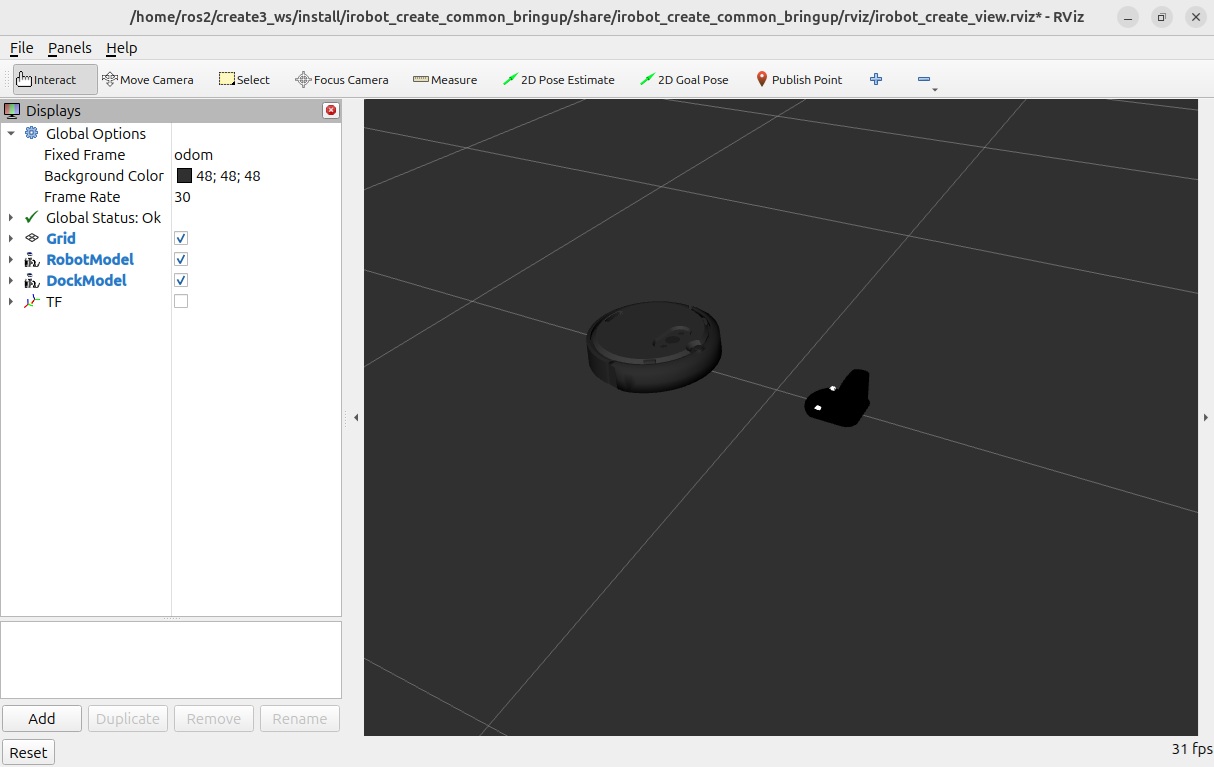
Figure 8. RViz screenshot with the Create3 robot. The menu on the left side allows you to control what RViz shows, which can include sensor data, reference frames etc..
After waiting for a few minutes for Gazebo to fully launch, open a new terminal window and run the ros2 topic list command to see the list of topics published by the Gazebo simulation node:
/battery_state
/clicked_point
/clock
/cmd_audio
/cmd_lightring
/cmd_vel
/diffdrive_controller/cmd_vel_unstamped
/dock
/dynamic_joint_states
/goal_pose
/hazard_detection
/imu
/initialpose
/interface_buttons
/ir_intensity
/ir_opcode
/joint_states
/kidnap_status
/mouse
/odom
/parameter_events
/performance_metrics
/robot_description
/rosout
/sim_ground_truth_dock_pose
/sim_ground_truth_pose
/slip_status
/standard_dock_description
/stop_status
/tf
/tf_static
/wheel_status
/wheel_ticks
/wheel_vels
The topics being published are almost the same as the ones published by the real Create3 robot, which facilitates testing our code in simulation.
A possible issue is that Gazebo opens but the simulation does not start. If RViz and Gazebo open, but then Gazebo crashes and the simulation never starts, it might be because it starts paused (that’s what happened in my case, for whatever reason). You can verify that by running:
gz topic -e -t /world/depot/stats
If the output is paused: true, then you should unpause it as soon as Gazebo opens. To do that, run the command to launch the simulation:
ros2 launch irobot_create_gz_bringup create3_gz.launch.py
Then, open another terminal and run the service call to unpause the simulation:
gz service \
  -s /world/depot/control \
  --reqtype gz.msgs.WorldControl \
  --reptype gz.msgs.Boolean \
  --req 'pause: false'
First, run the ros2 launch command. As soon as Gazebo window opens, go to the other terminal and run the service call to unpause it. This should prevent Gazebo from crashing.
RViz typically continues to work correctly even when Gazebo rendering is poor. Once Gazebo simulation is playing, you are encouraged to play around with RViz to see what it can do. If possible, control the robot in Gazebo and see the data changing in RViz.
To close RViz and Gazebo, go to the terminal where you launched them and press <CTRL+C>. It is not recommended to close the windows manually as it might cause issues!
Conclusion
In this chapter you studied and practiced important ROS 2 concepts, such as transforms (TFs), launch files, and ROS Bags. You also added packages to your existing workspace to a simple Create3 simulation using Gazebo while visualizing data in RViz.
After completing Part 1, you should have a good understanding of the main fundamental concepts of ROS 2. If you have access to a Create3 robot, continue to Part 2 to practice what you learned with a real robot. In Chapter 4 you will familiarize yourself with the Create3 robot, and in the subsequent chapters you will control it using ROS 2.
Navigation menu
- Go to the list of common ROS 2 commands ROS 2 CLI Cheat Sheet
- Go back to Chapter 2
- Continue to Chapter 4
- Go to the Main page